Saturday, February 26, 2011

Shrimp Arrabbiata

Featured Ingredient:

Diced Tomatoes
Arrabiata is Italian for angry.  The angry part of the dish refers to heat from the crushed red pepper. If you are like me, and not a big fan of spicy, you might only throw in a couple of red pepper flakes, so your dish will end up at best mildly miffed.

This recipe was inspired by a March 2007 issue of Cooking Light. It's another quick fix dinner... where the biggest work is in the prep.

Once you are done chopping, mincing, and grinding... the cooking process is rather fast. So if you have some appliances that can help you out with this, put them to work and get finished plates to your table even faster.  If you plan ahead, this can be put together in no time when you get home.

Shrimp Arriabbiata - 4 servings

1 16 oz. package fresh fettucine
2 tbsp olive oil divided
16 oz. raw shrimp thawed and deveined* (see note below)
Lemon juice
1/4 tsp salt
3/4 cup chopped onion
3 large garlic cloves or about 2 tsps finely chopped garlic
1/2 tsp crushed fennel seeds (you can break these up using a rolling pin, mortar and pestle or a small electric grinder
1/4 tsp crushed red pepper (optional - if you like heat or black pepper if not so much)
1.5 oz prosciutto diced
2 14.5 oz cans tomatoes undrained (I used diced for sauciness and 1 stewed for texture.  You can use any combination)
2 tbsps chopped fresh basil

Put water on the boil and add 1 tsp of salt.  Put on pasta to cook at Step 3.

1. Thaw shrimp and squeeze a little fresh lemon juice over them just before cooking.

2. Heat 1 tbsp oil in a large nonstick skillet over medium high  heat.  Add shrimp, saute for 3 minutes until pink but not completely cooked through.  Remove shrimp from pan.

3. Heat remaining 1 tablespoon of oil and add onion, garlic, crushed fennel seeds, pepper (red or black depending on your heat preference) and prosciutto to pan, saute 1 minute.  Stir in tomatoes, bring to a boil and reduce to a simmer.  Cook 3 minutes.  Return shrimp to pan and cook another 2 minutes or so until shrimp is cooked through.  Taste sauce and adjust seasoning. Garnish with basil.

Another alternative:  Use 8 oz. of shrimp and 8 oz. sweet Italian sausage (in this case omit the prosciutto).  Cook sausage first, set aside and keep warm and reincorporate it at the end.

NOTE BELOW: *Most shrimp that you buy at fish markets or in your grocery store has been previously frozen anyway.  Save yourself the markup and buy a bag of frozen shrimp.  Shrimp in these bags are normally flash frozen very soon after they are harvested, so the thawed shrimp in the fish case may be no fresher than the ones in the freezer next to it.  You can even find shrimp that have already been deveined and save yourself some time there as well. Since they are small, they can be thawed quickly under cool running water.  Then let them drain until they don't feel so solid anymore.   If you are not ready to use them by this time.  Put them in the fridge until ready to use.  Double check your package for instructions.
Shrimp Arrabbiata
You should be very happy with the end result of this "angry" little dish.


Wednesday, February 23, 2011

Portable Apple Pies with Cinnamon and Coriander

How about them apples?  Today I took a trip to Fresh Market in Westport, CT.  It's a far more simplified and smaller version of Whole Foods with the same organic, gourmet  feel. I came across this giant Fuji apple.  It is 4" tall.  Here it is next to its more average and smaller size hybrid cousins. For this recipe you will need 3 cups of apples or maybe 2 of these Fujis.

There are some herbs and spices that seem to be made for certain foods.  Their flavors marry well together and enhance each other such as:  Tomato and Basil or Lime and Cilantro.  For me that combo is Apples and Coriander.  Whether in a sweet or savory dish these two flavors are meant for each other and in fact if mixed with an apple's more traditional spicemate cinnamon heightens and dimensionalizes the apple even more.

It was the smell of coriander, the half eaten bag of little apples, and remaining puff pastry that inspired me to create this dish.  

Portable Apple Pies

Recipe created by Milda's Kitchen - Makes about 15 pies

3 cups diced apples (any sturdy baking apple, I used golden delicious)
Heaping 1/2 cup golden raisins
1/4 cup white sugar
1/4 cup brown sugar
2 tbsps flour
1 tsp cinnamon
1/2 tsp coriander
small pinch of salt
2 tsps lemon juice
1/4 tsp lemon zest
3 strips puff pastry - thaw according to package directions but keep in fridge until ready to use.
2 tbsps butter
1 beaten egg plus two drops of water

Preheat oven to 420F
Peel and dice apples.
 Mix apples in a bowl with raisins, sugars, flour, cinnamon, coriander, salt, lemon juice and zest.  Taste your filling and adjust to your liking.

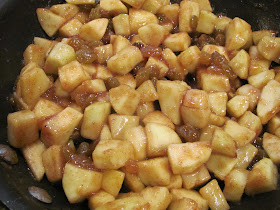
Melt butter in a smaller skillet over medium heat.  Saute apples and raisins for about 5 minutes to begin cooking process, plump raisins and carmelize sugars. Apples should still be firm.  (The cooking time in the pastry isn't very long so this helps so your apples aren't still hard when the pies come out of the oven).


Remove from heat to cool.  Beat egg and add water.

Roll out 1 strip of puff pastry until about an 1/8 of an inch thin. Cut dough with a pizza cutter to about 4" X 4" inch squares.  If they are a little rectangular the world won't end.
Dip brush into egg wash and lightly brush all sides of pastry. This gives a good bullseye area to put about 1 tablespoon of your apple filling.  Fold over opposite ends together and pinch to seal.  Use the tines of  fork to help seal as well.  Repeat.  Keep other puff pastry strips cold until ready to use or the dough doesn't rise as well.

Lay pies on an ungreased baking sheet.  Brush tops with egg wash. You may need to do two batches. Bake for about 20-22 minutes until golden brown.  If you accidentally poke a hole in the dough you might get some apple gooeyness pouring out.  But is that really bad?

Portable Apple Pies


This recipe is linked to:
Make Ahead Meals for Busy Moms

Monday, February 21, 2011

Chicken Pad Thai

Featured Ingredient: Bean Sprouts

Bean Sprouts

As with any stir fry dish all the work is in the prep.  Composing the dish is rather easy. One of the key components to achieving authentic Pad Thai flavor is Tamarind Paste. That was my biggest challenge in the recipe.

Chicken Pad Thai

6 oz. package Thai rice noodles
4 tbsps fish sauce
1 tbsp tamarind paste or 2 or more tablespoons tamarind pulp mixed with flour - see below**
2 tbsp brown sugar
1 tsp Thai sweet chili sauce
2 limes. 1 juiced; 1 cut into 6 wedges
12 oz. skinless boneless chicken breast thinly sliced
Vegetable oil as needed
2 large garlic cloves finely chopped
2 eggs lightly beaten
1 cup bean sprouts, rinsed and patted dry
3 tablespoons lightly salted peanuts chopped
1/2 cup scallions thinly sliced
1/8 cup fresh cilantro fine chopped

** For this recipe, I went to 4 stores including a large international market and could not find tamarind paste to save my life.  I found Tamarind drink, soda, pulp... no paste. Here is what it looks like in case you get lucky.

Given this hurdle, I compared other recipes for Pad Thai that use this ingredient. It mainly needs to be dissolved or watered down anyway to be incorporated into the sauce. You are really going for the sour element, not so much the texture.  I found tamarind pulp in the same type of boxes that you would find soy milk. I figured that would be the closest form. It is quite thin when it is poured out.  I heated about a 1/3 cup of juice wtih about two teaspoons of flour, to a boil in a smal saucepan, whiskly constantly until reduced and thickened to about the consistency of gravy. My goal was to make similar a looking and tasting mixture as a watered down the paste as well as flavor profile by reducing the pulp over heat thus concentrating the flavor.  It balanced well with the sweet from the brown sugar and chili sauce, salt from the fish sauce and tang from the lime. So my substitute was success.
Directions:

Prepare rice noodles according to package directions.  Depending on how fast of a "prepper" you are, don't do this first.  The noodles only have to soak for about 8 minutes.  Soak them until just softened but not mushy. Some packages have you soak in cold water, others want you to soak in boiling water.  So keep this timeline in mind as you prepare your other ingredients.  Prep remaining ingredients as needed.

Whisk together 3 tbsps fish sauce, tamarind paste (or tamarind pulp mixture), brown sugar, sweet chili sauce and lime juice.  Taste and adjust flavorings to your liking

Sprinkle remaining fish sauce over chicken.  Heat wok or large stainless steel skillet over medium high heat.  Add 1 tbsp oil (Hot wok, cold oil). Saute garlic cloves for 30 seconds until fragrant and lightly golden (so it doesn't burn). Remove from pan.  Add chicken, when cooked half way through add garlic back to pan. Finish cooking chicken.  Remove to plate.

Add more oil as needed and pour in eggs and let set for about 30 seconds. Lightly scramble but not totally cooked through.  Add chicken back to skillet, add noodles carefully back to pan.  Gently stir to noodles to minimize breakage. Add bean sprouts, half of peanuts, scallions and fish-sauce mixture. Cook 2 to 4 minutes until ingredients are coated and noodles are tender. Add a good pinch of cilantro and cook 1 more minute.

Garnish with remaining peanuts, cilantro and lime wedges.

Chicken Pad Thai

Sunday, February 20, 2011

Beef Ragout with Merlot and Root Vegetables

Featured Ingredients: Crushed Tomatoes, Beef Broth

4:00 p.m. is the witching hour. It's the time when I start to figure what am a going to make for dinner.  It's when I might hit the recipe books or internet looking for something deliciously different.   It's when I might make last minute dashes to the store to pick up any stray ingredients that are missing.  If the ultimate decision is some form of stew, I need to start on it around 4:45 p.m. in order to get it on the table by 6:30 p.m. By throwing just a few simple ingredients (which you may already have on hand) into your magic kettle you can transform them into a silky, delicious stew with not too much toil and trouble.
 
The great thing about a ragout, stew, pot-au-feu, daube or whatever you want to call it is that it can be unique every time depending on what you throw into it.  You just need to follow some basic guidelines to serve a group of 6 to 8. 
 
About 1.5 lbs meat
About 4 cups of liquid (broth, wine, vegetable juice)
About 5 1/2 cups of vegetables (potatoes are a must as the starch helps thicken the liquid)
Onion and Garlic (for flavoring/do not count as part of the vegetables)
Herbs of choice
Salt and Pepper
 
Below is my result  using this ratio. What do you think of my title? It sounds so much fancier than Beef Stew. The final dish yields a silky, luscious and creamy-like sauce that merits a better descriptor.

Beef Ragout with Merlot and Root Vegetables
 
olive oil as needed
2 tbsps all purpose flour
1.34 lbs of beef stew meat cut in 1 inch pieces
1 3/4 cup chopped onion
3 cloves garlic
1 cup merlot wine
3 cups low-sodium beef broth (1 15 oz. can yields a little less than two cups - so would need two cans)
2 cups crushed tomatoes
1 tsp dried rosemary leaves
1 tsp dried marjoram leaves
1/2 tsp oregano
2 dried bay leaves
1 tsp salt
2 cups carrots sliced
1 cup parsnips sliced
2 cups potatoes in 1 inch pieces (russet not recommended as they break down to easily - all purpose, red, yukon work)
 
Heat 1 tablespoon olive oil in a 5.5 quart dutch oven over medium high heat.  Season beef and place into a plastic bag with the flour. "Shake it Up!"  In two batches sear beef on almost all sides.  I don't brown the meat all the way, as I find the fond or brown bits become black bits on the bottom of my dutch oven by the end of the second batch. Remove meat to separate plate. This is how brown I go:

Lower heat to medium, add additional oil if needed and sautee onion for about 3 minutes and garlic for another minute until soft and fragrant and starting to brown.  Remove to plate with meat.

Add merlot, bring to boil and reduce by half.  I'm not a drinker so these are great for cooking.  I don't have to waste a whole bottle. Each bottle equals about 1 cup of wine. It adds better flavor than the cooking wines you find in your grocery stores.  As the cardinal rule is do not cook with something you would not drink by itself.

Return meat, onion and garlic to dutch oven and add broth, tomatoes, herbs, and salt.  Bring to a boil and reduce to a lower simmer.  Simmer for an hour.  Be sure to check after a few minutes to make sure that your ragout isn't rapidly boiling and adjust temperatures so that it stays at a slow and steady simmer.

Cut up remaining vegetables and set aside.  Keep potatoes in cold water.

After 1 hour add remaining vegetables and bring to a boil again, then reduce to a low simmer.  Simmer until vegetables are tender about a 1/2 hour.


Beef Ragout with Merlot and Root Vegetables
I cook stew on my range top vs. the oven. The great thing about one pot meal like this is although they take some time to develop the flavor you don't have to babysit it much and can clean up and multi-task in the meantime.  This leaves the oven free if you want to bake some biscuits to go with the stew or even a pie using prepared crust. If you have more time, have two ovens, or aren't baking anything else you can put the dutch oven in your bigger oven at 350F and simmer for the hour.  Then add the vegetables and continue for another 1/2 hour. 


Thursday, February 17, 2011

Chicken Fried Steak with Creamy Beef Gravy

Featured Ingredients: Evaporated Milk, Beef Broth

I participated in a webinar the other day sponsored by the IACP (Institute of Culinary Professionals) on 10 things every food writer should know.  I could stand to learn more than 10 things but I thought it would be a good start.  The guest speaker was Dorothy Kalins the founder of Saveur Magazine.  One of the topics discussed was about honoring and glorifying the home cook vs the rock star chef.  Simply put, the home cook prepares meals differently than a chef does.  The knife skills may be more rustic, the ingredients are familiar, but the flavors can be just as good and the meal a lot more comforting.  We can all stand to benefit from home cooking, by selecting our own ingredients, limiting the amount of fat used and thus controlling our and our family's calorie intake.  OK, this recipe doesn't necessarily qualify as calorie conscious, but I have a family of naturally thin active men, with high metabolisms so they don't care. It does however qualify as down home cooking.

On that note, this meal doesn't get any more down home.  It originates from the Southern United States and is the epitome of comfort food.  It looks like a chicken cutlet but under that crispy coating is a steak in disguise.  Ramp up the level of comfort and serve this with a luscious latte-colored gravy and some silky mashed potatoes.  And if you really want to increase the carb factor, add some country biscuits.

For this recipe I opted for my 12 inch big-ass deep skillet...

Chicken Fried Steak

1.25 lbs cubed steak (you can buy this already prepared in the store)
Salt and Pepper or All Purpose Seasoning like Adobo
1 cup all-purpose flour for dredging
3 large eggs beaten
1/2 cup vegetable oil (enough to coat bottom the skillet and come up a little up the sides - you don't want to submerge the steaks)

Heat oil to 375F over medium heat
Heat oven to 250F.  This will keep the steaks warm when you prepare the gravy. Put in a rack over a large sheet pan or a broiler pan so any of the excess fat can drain.

Season steaks:

Dredge meat in flour.  You can pat the flour into the meat a little to  help it stick. Dip in eggs and dredge in the flour again.

Add meat in batches to pan, be sure not to overcrowd pan or that reduces the temperature of the oil too fast and your meat absorbs more oil.  I had two larger pieces and four smaller pieces.  I cooked the two larger pieces first then cooked the four smaller pieces.

Cook for about 3 minutes and turn when steaks start to "bleed".  You only want to turn the steaks one time. Cook another 3 minutes or so, until juices start to look clear. NOTE: Frying eats up a lot of salt and seasonings. So season the steaks with a little salt and pepper when they come out of the pan. Place in oven to keep warm. 

Creamy Beef Gravy

1/4 cup of pan drippings
3 tbsps flour
1 12oz. can of Evaporated Milk
1 cup Beef Broth
Salt and Pepper

When steaks are cooked.  Remove all but 1/4 cup of pan drippings.  Over low-medium heat, add 3 tbsps of flour and whisk, to incorporate drippings and flour.  Add evaporated milk and beef broth and continue whisking until mixture begins to thicken and coats the back of a spoon.  The fancy French term is "nappe" - like "Nap-Ay".  Pour over steak and whatever other accompanying carb you have on the plate.

Chicken Fried Steak with Creamy Beef Gravy


Tuesday, February 15, 2011

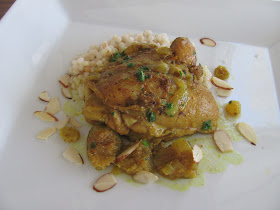
Moroccan Spiced Chicken Braise with Figs

Featured Ingredient: Figs

As a part of my mission to expand the list of canned good options for this blog, I give you the following recipe.  It is inspired by a Chicken Tagine recipe I made in Culinary School.

My first impression of these figs was not what I expected.  While they are in light syrup, the flavor they gave off was more of a salty brine with a teeny bit of sweet.  I had found a similar recipe for Moroccan Chicken that used green olives, but after tasting the figs, I think I had that color and flavor covered, so I did without the olives.  I added golden raisins for additional sweetness.   The addition of the almonds was my own inspiration.  Not only are they good for you, but if you are nuts over nuts, they work really well with this dish and add a nice delicate texture.

Moroccan Spiced Chicken Braise with Figs

Olive oil as needed
2 lbs bone in chicken thighs without skin
1 3/4 cup Spanish onion chopped
1/2 tsp powdered ginger
1/2 tsp cumin
1/2 tsp cinnamon
1 tsp turmeric
1 tsp coriander
1 tbsp honey
2 cups chicken broth
1/4 cup chopped cilantro
1 15oz can Figs, cut into bite sized pieces (about 1 1/4 cup)
1/2 cup golden raisins
Sliced almonds for garnish

Heat a small amount of olive oil in a deep skillet or wide rondeau on medium high heat.  Season chicken with salt and pepper.  "Brown" chicken until lightly golden on each side, but not cooked through. Remove to another pan.

Lower heat to medium and add the onion and sweat until translucent. Add ginger, cumin, cinnamon, turmeric, coriander and cook about 2 more minutes, until fragrant.  Add broth, honey and bring mixture to a boil, then reduce to simmer.

Return chicken pieces to pan and simmer chicken bone side up for about 15 minutes.  Turn pieces over and add figs, and raisins.  Simmer an additional 10 minutes until chicken registers at 180F.  Sprinkle with cilantro and slivered almonds if desired for additional texture.

Serve with Israeli Couscous


Moroccan Spiced Chicken Braise with Figs


Sunday, February 13, 2011

Field Trip - Food Bazaar

I wanted to share with you one of my favorite places to go re-stock my inventory of cans.  This is Food Bazaar in Bridgeport, CT.  It's a small chain of grocery stores in the tri-state area (NY, NJ, CT) that cater to a very diverse and multicultural demographic. The chain is relatively small, but everything else about Food Bazaar is larger than life from the mounds of Yucca and Tomatillos to the 9 ft. floor to ceiling end cap displays.

For those who live in New York City, this store offers about the equivalent in terms of the availability of unique ingredients  that you wouldn't find in a suburban Stop and Shop.  
In case you are looking forward to a recipe with this ingredient, I wouldn't hold your breath.  Or this one...

The contents of this package were not visible, nor could I bring myself to even look at them.  But it is intriguing. 
Along with about every edible piece of an animal, there are some great deals, for the more traditional carnivore.

I also love exploring the aisles.  This place redefines the small selection of ethnic ingredients you might find elsewhere.  Instead of Latin foods, aisles are specifically marked Eucadorian, Colombian, Peruvian, catering to every little deviation of South American cuisine.  Asian aisle?  No, there's Korean, Chinese, Japanese, Thai, not to mention what you can find in the refrigerated sections.  So you can imagine what kind of cans I find...

I didn't even know what this was.  It is apparently the national fruit of Jamaica and needs to be harvested, prepared  and cooked very carefully or you will be "ackee-ing" all over the place and can potentially die.  The fruit needs to be picked only when the pod it comes in has naturally opened.  Only the arils of this fruit can be eaten and need to be boiled for 30 minutes.  Under ripe fruit is toxic. I got a kick out of this description on Wikipedia. "Though it may be poisonous when improperly prepared, ackee has high nutritional value and is rich in essential fatty acids, vitamin A, zinc, and protein." I don't know, maybe not worth the risk.  Instead, I bought a can of Lychee and Figs - so let's see what I come up with for that.

I took this picture in case someone comes after me for using Andy Warhol's image in my masthead

Cans at Food Bazaar also come in all sorts of shapes and sizes including this 6 lb commercial sizes

If you ever get a chance you should visit this store.  It is highly educational and a lot of fun. That's about it for our visit.  Thanks for coming shopping with me. 

Saturday, February 12, 2011

Valentine's Day Dessert - Sachertorte

Apricots
Featured Ingredient: Apricot Halves

The Sachertorte originates from Vienna, Austria, a beautiful romantic city. I have traveled to some beautiful European cities three times in my life and ironically every time, I traveled solo. There was just something magical about traveling as a young woman to a beautiful country in search of romance.

If you have already have that someone special or have a similar love for chocolate with a hint of fruit, this dessert is for you.  I will caveat that this is not a time saving recipe.  But if you are creating it for someone you love, I'm sure you don't mind spending a little extra time.  The cake is adapted from Bon Appetit.  The apricot and chocolate glaze recipes were modified to incorporate elements of our Featured Ingredient.

This dessert requires a lot of tools and equipment, but is really well worth effort.

Sachertorte:
4 1/2 oz. bittersweet chocolate, like Ghiradelli, finely chopped
9 tbsps unsalted butter ( 1 stick plus 1 tbsp) at cool room temperature
1 cup confectioners sugar
6 large eggs separated, cool room temperature
1 tsp vanilla extract
1/2 cup granulated sugar
1 cup all purpose flour

Torte: Heat oven to 375F.  Butter a 9 inch springform pan and line the bottom with parchment paper. Dust sides of the pan with flour and tap out excess.

Melt chocolate in the double boiler over simmering water stirring with whisk or microwave at medium power.  Remove from heat and let cool.

Beat butter in stand mixer with paddle blade on medium high speed until smooth about 1 minute.  On low speed at confectioner's sugar.  Return to higher speed and beat until light and fluffy about 2 minutes.  Beat in egg yolks one at a time.  Scrape down sides of bowl.  Beat in chocolate and vanilla.

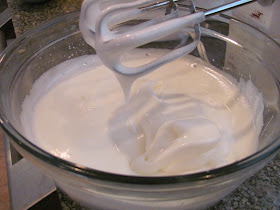
In a separate large bowl, beat egg whites and granulated sugar with a hand held mixer at high speed  until they form shiny white peaks. 
Stir in about 1/4 of the beaten whites into the chocolate mixture to lighten it, then gently fold in remaining egg whites, leaving some whites showing. Sift half of the flour over the chocolate mixture, gently fold in with a rubber spatula.  Sift remaining flour and fold in gently again.

Spread evenly into prepared pan.

Bake for about 45 minutes until a toothpick inserted in the center comes out clean.  Cool on a wire rack for 10 minutes.  Remove sides of pan and invert the cake onto the rack. Remove paper. Flip cake back over and cool completely.
While cake cools make Apricot Glaze

1 15oz. can Unpeeled Apricots - peeled and pureed
(Save syrup in the can for use in the Chocolate Glaze)
3 heaping tablespoons Apricot Jam

Remove apricots from can and remove apricot skin with your fingers.  The apricots are soft, so the skin comes off rather easily. Puree apricots in a food processor or mini chopper until smooth.  Add to saucepan along with the apricot jam.  Whisk to incorporate. 

Bring apricot mixture to rolling boil over medium heat and cook stirring occasionally with a whisk until thickened, about 5 minutes. Use while still warm.

Apricot Glaze
 

 Back to Torte:

Using a long serrated knife, trim top of cake to make level.  Cut cake horizontally into two equal layers (as best as possible).   Brush top of cake generously with glaze.  Brush top of bottom layer with glaze, spread any remaining glaze in center of bottom layer and replace top layer.  Be sure to glaze sides of cake as well.  Let cool for about 1/2 hour until glaze is set.

Place cake on a cake stand and place fat strips of parchment paper under the cake.  The paper will catch the overflowing chocolate glaze that we will make next. 

Chocolate Glaze
3/4 cup heavy syrup from apricots
6 ozs. Dark semi sweet chocolate coarsley chopped.(I bought a special block for this).

In a heavy bottom medium size sauce pan bring the syrup and chocolate to a rapid boil.  Reduce heat to medium. Using a digital thermoter cook and stir glaze until it reaches 234F.  Remove from heat.
Stir to cool and slightly thicken about 1 minute.  Pour gently over cake spreading evenly over the top and sides with an offset spatula.  Place in the fridge for about 1 hour to harden.  The chocolate glaze should have a soft fudge like consistency when set, not like a hard ganache.

Serve with whipped cream or additional apricot puree for color.

Easy Whipped Cream:
1 cup heavy cream
2 tbsp confectioners sugar
1/2 tsp vanilla

Whisk on high speed until white peaks form.  Don't over beat or you'll get butter.

Valentine's Day - Sachertorte
May you have a wonderful evening.

Wednesday, February 9, 2011

Spanokopita Triangles - Mini Greek Cheese Pies

Spinach
Featured Ingredient: Spinach

Here is something you might to throw into your afterschool snack rotation.  My 14 year old, who is a big eater but has limited palette, has been choosing these over nachos.  These hand held goodies also are a great idea for an appetizer.

Spanakopita Triangles - Yields 15 triangles.  Double the recipe for a party

1 15 oz. can of spinach (yields 3/4 cup spinach once drained and "de-moisturized" You can of course use frozen spinach for this as well)

4 oz. of feta cheese crumbled
3 tbsps ricotta cheese
1/4 tsp lemon zest
1/8 tsp freshly grated nutmeg
3-4 scallions chopped
1 large clove garlic minced
3 sheets of Puff Pastry - Thawed according to package directions
1 egg beaten

Preheat oven to 375F

Drain spinach and squeeze out as much water as possible.  I put it  in a fine mesh sieve and press the water out.  Then I put the spinach between two paper towels and press to release moisture. You should end up with about 3/4 cup.  Place in a large bowl.

Add feta, ricotta, lemon zest and nutmeg.  The lemon zest is key.  It brightens up the flavor of the canned spinach.

Saute onions and garlic for about one minute until fragrant and onions are a bright green. Add to spinach mixture.

Roll out puff pastry.  Create  4" X 4" squares with a pizza cutter.  It's OK if your square are not perfect or a little rectangular.


Brush sides of pastry with egg.  Place about 1 tablespoon of spinach mixture toward the top left side of your square.  Make sure to leave a little border to seal the packet.  Fold the opposite corner over and seal with your fingers or with a fork.

Ready for the oven
If your square was more of a rectangle you can fold over any additional dough to seal.  Seal well or the pies tend to open while baking.  If they do, the filling doesn't run out of them.

Brush tops of triangles with egg before baking

Bake for about 25 minutes until golden and sizzly on the inside


Spanokopita Triangles


Tuesday, February 8, 2011

Red Quinoa and Cherry Muffins


Beets
Featured Ingredient: Beets

I made these in honor of Valentine's Day this year, with their warm pink color studded with deep red cherries it just seemed an appropriate way to start you and your loved one's morning off right with a healthy breakfast before loading up on wine, chocolate, and other guilty pleasures.

In honor of Valentine's Day, I wanted to make these muffins as red as I could using nature's palette, so I chose beets. I had food coloring but considering these muffins have a number of natural power food ingredients like quinoa and beets, I couldn't bring myself to enhance them with artificial food color.  Make no mistake these muffins are not savory but have a sweet cinnamon flavor are loaded with satiating fiber.

Red Quinoa and Cherry Muffins
1 cup red quinoa rinsed
1 8 oz. can Beets undrained
1/4 grapeseed oil
2 cups all purpose flour
3/4 cup turbinado sugar
1 1/2 tsp baking powder
2 tsps cinnamon
1/2 tsp salt
3/4 cup dried cherries
3/4 cup beet puree
1 egg
1 tsp pure vanilla extract
1-2 tbsp grape juice

Preheat oven to 350F.  Cook quinoa according to package directions until tender.  Grains should separate when mixed.  Best way to judge doneness is there are little white rings around each grain.  You will end up with a little more quinoa than you need for the recipe.  Spread out on a baking sheet lined with parchment paper to cool.

Meanwhile brush a standard 12 cup muffin pan with cooking spray and puree beets with juice in a food processor until smooth.


In a medium bowl, whisk together flour, sugar, baking powder, cinnamon, salt and dried cherries.  Add 2 cups cooked quinoa.

In a small bowl whisk together oil, egg, beet puree, vanilla extract and grape juice (optional).  I added grape juice for a little extra sweetness and red color.

Add wet mixture to dry mixture and stir until combined.  Do not over mix. Divide mixture among muffin cups.  I had batter for a little more than 12 muffins.

Bake until a toothpick inserted in the center comes out clean about 25-30 minutes.  Rotate your pan in the oven, 1/2 way through bake time. Cool muffins in pans 5 minutes then remove to a wire rack to cool completely.


Red Quinoa and Cherry Muffins

This recipe is linked to: Tastespace Breakfast Club #9
and Fuss Free Flavours

Monday, February 7, 2011

Easy Pork Stir Fry with Even Easier Asian Noodles

La Choy Bean Sprouts
Featured Ingredient: Bean Sprouts

There are about 5 meals that my family and I agree upon.  That means on those days I only need to work on one meal vs. "catering service" to ensure everyone eats and everyone is happy.

I usually create this recipe by eyeballing and adding a bit of this and a dash of that.  So with measuring cups and spoons in hand I've created my version of an Easy Pork Stir Fry with Asian Noodles. You can use a wok or a stainless steel 12 inch skillet. 

There are two key thing to remember for stir frys:

1. Hot Pan. Cold Oil

2. It's all about the prep.  All ingredients need to be fabricated, chopped, minced, shredded, whatever before you are ready to cook. The actual cooking process is rather fast, there is not much time in between the addition of each ingredient. 

Pork Stir Fry - Serves 6 easily
2 tbsp toasted sesame oil* (divided)
1 tbsp fresh ginger minced
2 large cloves garlic
1/2 cup scallions divided (leave a little for garnish)
1 lb pork tenderloin or boneless pork sirloin chops cut into 1 inch pieces
1 tbsp cornstarch
2 carrots - about 1 cup shredded
1 cup Bean Sprouts
2 1/2 cups coleslaw mix or cabbage shredded
2 tsps rice wine vinegar
1/3 cup stir fry sauce
Salt and Pepper to taste

3 eggs
olive oil cooking spray
Toasted Sesame Seeds for garnish
* NOTE: There are two types of sesame oil, use the one for cooking not just flavoring.

Set a pot of salted water to boil. 

In a small bowl add pork and one tablespoon cornstarch, mix and set aside.

In a heated skillet or wok, pour in 1 tbsp toasted sesame oil, add ginger, garlic and scallions and stir until fragrant about 1 minute.  Add pork and stir fry until lightly browned on outside and nearly all pink is gone on the outside (do not cook through - it will cook more later). Remove to a separate bowl. 

Add another tbsp of sesame oil and add carrots, coleslaw mix, and bean sprouts.  Add vinegar to help scrape up bits from bottom of pan. Stir fry for about 2 minutes

Return pork to skillet and add stir fry sauce.  Mix all ingredients and continue cooking for 3 to 4 minutes until thickened and pork is cooked through.  Set aside skillet and keep warm.

Beat eggs and cook in another wide non-stick skillet by rotating raw eggs in pan. Flip. (It's OK if it doesn't flip perfectly as your going to cut up the eggs into pieces when they are done).  Add cooked eggs to pork.  Season dish with salt and pepper.  Garnish with remaining green onions and toasted sesame seeds.

Asian Noodles
12 oz. dried linguine
2 tbsps toasted sesame oil
3 tbsp teriyaki sauce
1/3 cup stir fry sauce

Cook linguine according to package directions.  Drain.  Return linguine to pot.
Add sesame oil, teriyaki sauce and stir fry sauce.  Mix together until noodles are a shiny light brown color. Adjust amout of sauces according to tastte.

(Any long flat or fat spaghetti like noodle with a little surface area works for this.  Really thin pastas like angel hair and capellini are not recommended.)


Easy Pork Stir Fry with Even Easier Asian Noodles