Saturday, October 1, 2011

Lamb Tagine with Chickpeas and Apricots

Featured Ingredients: Diced Tomatoes, Chickpeas AKA Garbanzo Beans.

AAH-ctober!  crisper air, lower humidity and the perfect backdrop for Uncanny Goodness.  I took quite a hiatus since summer.  Mostly busy because of my job which takes me away from home for at least 12 hours a day. 

Today was a great day, so I wanted to share it with you and celebrate with a long overdue blogpost. My family and I went to the Greenwich Audobon Society Hawk Watch event.  For those of you not from the Fairfield County CT area, Greenwich is an EXTREMELY affluent area, with some homes ranging in the 10's of millions!  Greenwich boasts residents like Ron Howard, Mel Gibson (at one time), Kathie Lee Gifford, among other less notable figures with similarly deep pockets.  Unfortunately, no celebrity bird enthusiasts were to be found.  I live in nice town, but not nearly of that caliber. My son and I believed there were bluebloods looking down on us saying "This is what shows up when you open up these events to the public."  With that kind of financial backing it was a great event.  They had live raptor bird shows featuring Falcons, Hawks, petting zoos, eco-friendly vendors and all sorts of activities.  

This Great Horned Owl was awesome.  You could walk pretty much right next to it, and it could care less that you were there.  Beautiful bird with talons that can exert 100 lbs of pressure.  I was amazed by how quiet there wings are when they flap them, so they can really take their prey by surprise.


Here I am with a burmese python:


Oh well, unlike most Greenwich residents, I had to rush home as it is a 45 minute drive and rely on my own personal chef self to make dinner. Recently I saw this dish in the October issue of Bon Appetit.  I adapted the recipe a little for 1.5 lbs of lamb and to save time.

Lamb Tagine with Chickpeas and Apricots (About 5 servings depending on how hungry you are)

1 19 oz. Can of Garbanzo Beans, drained and rinsed - I used about 1/2 a can
3 garlic cloves minced
1 large cinnamon stick
2 tbsp olive oil
1.5 lbs leg of lamb or leg, lamb shoulder or leg of lamb steaks cut into 1/2" cubes*  If you use steaks save the bones and braise them with the rest of the meat for additional flavor. Then scrape off any meat at the end remove bones.
1 medium onion diced
3 tsps Spice Mixture (recipe follows)
1/2 tbsp peeled chopped fresh ginger
1 cup canned diced tomato with juices
1 3/4 cup chicken stock
1/2 cup dried apricots quartered
1 tbsp chopped cilantro
1/2 tbsp cornstarch
Salt and Pepper as needed

Spice Mixture (This makes more than you need for the recipe, so save the extra)
3/4 tsp ground coriander
1/2 tsp ground cumin
1/2 tsp crushed red pepper flakes
1 1/4 tsp ground cinnamon
1 tsp paprika
1/2 tsp ground ginger
1/2 tsp turmeric
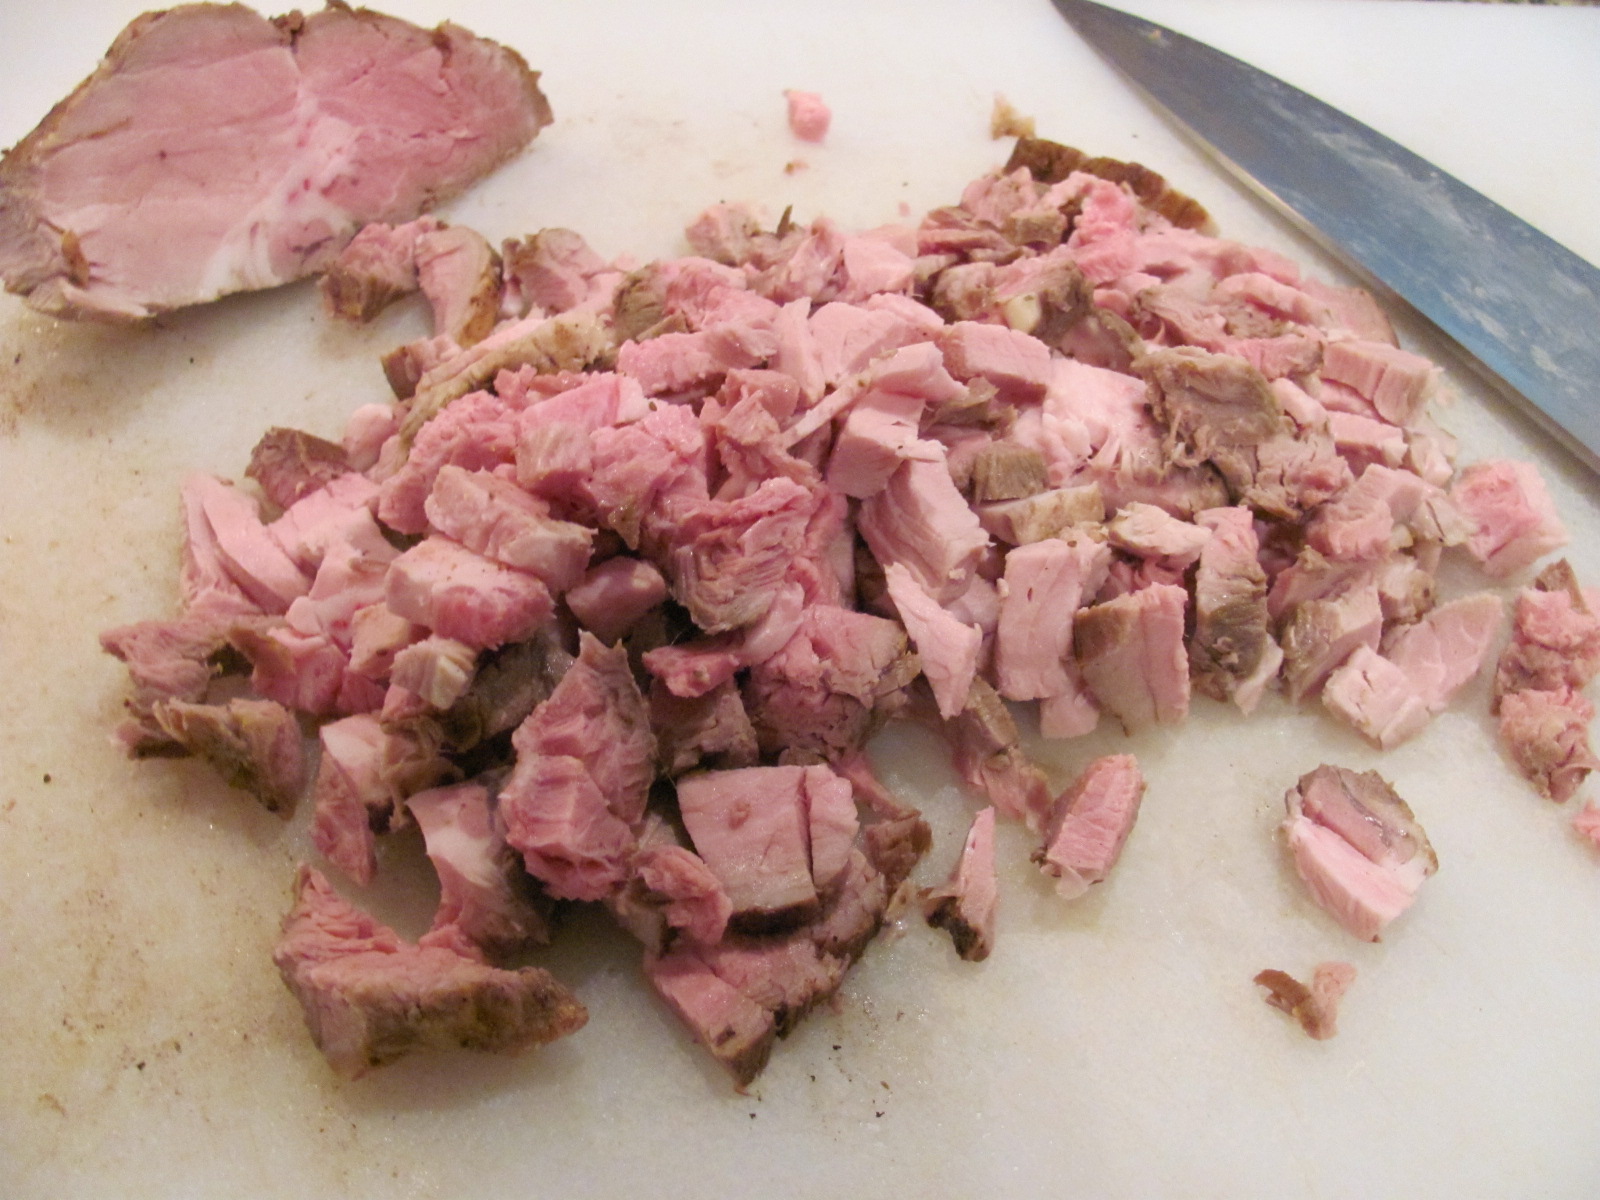
Heat oil in a shallow dutch oven or "tagine" over medium high heat.  Season lamb with salt and pepper and brown lamb on all sides working in 2 batches about 4 minutes per batch.   Transfer lamb to a bowl.  This is the before picture:


Big Pile O Lamb


Add onion to pot, season with salt, reduce heat to medium and saute until softened and beginning to turn golden about 5 minutes. If the fond on the bottom of your pot starts to get too brown add stock now to deglaze.  Add minced garlic, spice mixture and ginger, stir one minute. Add tomatoes and return lamb to pot with any juices.  Bring to a boil reduce to a simmer. Add a cinnamon stick. Partially cover and simmer for 1 hour or until lamb is tender.

Bubble Bubble
Stir in chickpeas and apricots, simmer until heated through about 10 minutes.

Remove cinnamon stick.  Ladle out about 1/4 cup of cooking liquid from the pot and add about 1/2 tbsp cornstarch, to create a slurry.  "A pourable thickener".  Add back to pot and let simmer another 5 minutes until more thickened like a stew. Add cilantro and serve over couscous.

The mixture of warm spices like cinnamon and ginger mingle so well with savory tomatoes and sweet plump apricots.  Comfort food at its best.


Lamb Tagine with Chickpeas and Apricots

Couscous. (Follow the package directions, but simply:

1 cup chicken stock
1 cup couscous
1/2 tsp salt
1 tsp butter
Tiny pinch of saffron

Heat stock, salt, butter and saffron to a boil.  Add couscous.  Cover and remove from heat for 4 to 5 minutes.  Fluff with fork.


Wednesday, July 20, 2011

Summer Zucchini Carrot Bread

Walnuts
Featured Ingredient: Walnuts (Optional)

Time to enjoy Summer's Fresh Bounty of produce.  We all are probably less apt to use canned goods this time of year, especially with the bevy of fruits and vegetables that the summer months bring at reduced prices.  I don't know about you, but  this year I'm not seeing as much of a difference in the cost of  the local fare than the produce that came from Chile in the winter time. Probably has a lot to do with the freight cost of $4+ dollars a gallon.  Fortunately, my area has one beacon of hope.  If I am looking to make a pie or something that requires several pounds of something, I tend to take a trip over to Food Bazaar a limitless international market, with prices that are more in line with what you would expect in Summer. Last week I got beautiful, just ripe peaches for 99 cents a pound. They were transformed into a Peach Pie, topped with Tahitian Vanilla Ice Cream and Whipped Cream.  That's a recipe for another time.  Or the next time they go on sale.

Summer Zucchini Carrot Bread

This is one of the my favorite summer quick breads.
It's filed under Walnuts. If you don't want the additional texture, just omit them. (I had to put this entry somewhere). As all us foodies know, people eat with their eyes.  The beauty of this bread is when it's sliced, it's also very pretty with its little emerald and topaz flecks.  Let's be honest, quick breads are really loaf-shaped muffins in disguise and muffins are really heartier cupcakes.  However, the ingredients in this quick bread are rather healthy and could justify an additional piece or two.  There's beta carotene from the carrots, low cholesterol canola oil, antioxidants from the cinnamon and of course fiber from the unpeeled zucchini.  It's a great mid morning snack or accompaniment to your afternoon coffee or tea. Instead of big loaf make small little loaves to help with your denial. You can also freeze the loaves for up to a month, so none of this scrumptiousness goes to waste.  If you don't have one of these, I seriously recommend you buy one.  I got this one at Home Goods a while back.  It makes the perfect size little loaves, that are also great for gifting around the holidays.

I love this thing!
Zucchini-Carrot Bread

2 medium zucchini - washed but not peeled (about 1 lb)
2 large carrots (about 1/4 lb)
2 large eggs
1 3/4 granulated sugar
3/4 cup canola oil
1 tsp vanilla extract
3 cups all-purpose flour
1 tsp salt
1 tsp baking soda
1/2 tsp baking powder
1/2 tsp ground cinnamon
3/4 cup chopped walnuts

1. Preheat oven to 350. Grease and lightly flour the bottom of a 9" x 5" loaf pan or multipe mini loaf pan.

2. In a food processor fitted with a shredding disk, process zucchini and carrots until shredded.  (You should have about 4 cups of shredded vegetables.

Shredded Carrot and Zucchini

3. In a large bowl, combine eggs, sugar, oil and vanilla untl blended.  In another bowl, combine flour, salt, baking soda, baking powder, and cinnamon.  Gently fold dry ingredients into egg mixture, stirring until combined (batter will be thick).  Add zucchini-carrot mixture; stir until combined.


4. Turn batter into prepared pan (s). If using the 9" X 5" pan.  Bake 1 hour and 5 minutes and check with a toothpick.  If if does not come out dry, continuing baking. Baking time vary by oven.  You are better off, checking before it's overdone.  For smaller loaves bake about 45 minutes.

5. Transfer pans(s) to wire racks.  Let cool 15 minutes.  Remove bread from pan and let cool completely before slicing.

Moist heavenly-ness!


Zucchini Carrot Bread


Tuesday, July 5, 2011

Jam-Asian Fusion Paella

Featured Ingredients: Kidney Beans & Coconut Milk

Hope everyone had an enjoyable 4th of July weekend.  Aside from the extra day off, which should be standard, it was a typical weekend. My favorite part was that I got to listen to fireworks for 4 straight days. The neighboring towns each had their turn.  The fact that my town is bordered by 5 others, makes me that much more fortunate in this regard.  Last year, I was lucky as it poured rain on the 4th of July.  Ahh peace.

My kids don't care anymore, so now fireworks are nothing more than noise.  At least with a commercial show you can guarantee things will get quiet by 10:30 p.m.  Then there are the (insert descriptive expletive noun here) that just can't get enough and stock up so they can shoot them off around 11 p.m. or later.  I'm also fortunate enough that firework purchases are legal in my state. I used to have a neighbor that lived behind me, who would shoot of bottle rockets and all sorts of very loud fireworks, close enough for me to find pieces of ash in my yard.  Probably to impress his kids, or so he thought. He and his wife got divorced a couple of years ago. I guess she got sick of the fireworks too.  The neighborhood has been far quieter ever since.

Well, aside from the fireworks, nothing is more synonymous with July 4th than a picnic.  We laid low this year, but we did do some outdoor dining. Here is one of the Uncanny Goodness dishes I made.

I started with Chorizo Sausage with Mango from Whole Foods. 

Chorizo Sausage with Mango

I thought the best way to incorporate this would be to take flavors from cultures that dominantly use these ingredients in their cooking.  I ended up with a fusion dish borrowing tastes from India, Thailand, Latin America and Jamaica, creating somewhat of a deconstructed Paella.

Starting with fragrant Basmati rice I did a variation on Caribbean Rice & Peas which is really Kidney Beans, using Coconut Milk and a bit of Curry Powder.  I topped that with Sausage and Chicken Vegetable mixture with Mango Chutney to bring out the sweet mango flavor. (I found their weren't enough pieces of mango in the sausage - but the idea was there.)  In retrospect I would have sliced the sausage vs. cooking it outside of its casings and had larger pieces of chicken.  But the flavors did come together and was a nice switch from our predominantly Mexican, Italian, or American Bistro repetoire.

Jam-Asian Fusion Paella - Serves 4

Rice Recipe:
1 1/2 cups basmati rice
2/3 cup Coconut Milk
1 3/4 cup chicken broth
1/2 tsp curry powder
1/4 tsp salt
1 14.5 oz can kidney beans 

Rinse Rice until water runs nearly clear.  Let drain.  I have been reading about this method and it really works.  Other sites say to soak it, but I was very happy with the results with just the rinsing.  Another great tip is to let the rice cook about 10 minutes on low heat until the water is absorbed (it seems to absorb way faster than it is supposed to - then take off the heat and let the rice expand and soften for another 10 minutes).  You should end up with separate tender grains - not a sticky mess.

Heat chicken broth to boil.  Stir in coconut mik, curry and rice.  Stir. Reduce heat and let cook on low to simmering heat for about 10.  Check rice after 10 minutes to make sure it is not sticking to the bottom. Stir in kidney beans.  When rice is al dente.  Take off the heat and let it sit for another 10 minutes or so until tender.  Fluff rice with fork

Meat Mixture
Olive Oil as needed
1 cup chopped vidalia onion
1 large clove garlic minced
1/2 cup sliced celery
1/2 cup diced red pepper
3 links chorizo sausage
2 cups cooked chicken
1 tbsp mango chutney
1/2 tsp coriander

Salt and Pepper to taste

Heat olive in a heavy 12-in skillet.  Add onion, pepper celery and saute until vegetables are shiny and the celery and red pepper are crisp tender (about 3 minutes).  Add garlic and saute for 1 minute.  Add sausage and cook until cooked through (the idea is to make sure your vegetables are not overdone by the time your sausage is done (about 10 minutes).  If you find you are getting a lot of brown bits add a little chicken broth to deglaze the pan.  Add mango chutney, coriander and cooked chicken and saute until heated through.
Use 1 tbsp cilantro as garnish.

Serve over rice.


Jam-Asian Fusion Paella

Tuesday, June 21, 2011

Summertime Treats - Ice Cream and Strawberries

As summer rolled in a few hours ago, it seems appropriate to celebrate some of its pleasures. 

The other evening as I was walking my dog with my husband asv as Good Humor truck chimed its way down a quiet street.  It's comforting with all the changes and technological advancements since I was a child in the 70's and 80's that there are a few lingering details that still hold true today.  Unfortunately, instead of kids creatively playing on that quiet street, they are more than likely chained to their XBox or texting their next door neighbor, which leaves little hope for the Good Humor lady. Our street is the only one where she may have a prayer. We happen to live across the street from a rather heavy set and lazy family.  (We live walking distance from a Stop & Shop and they constantly order from their Pea Pod delivery service, among other things).  My husband said, when the Good Humor truck comes, he has never seen them move so fast.

I've traded in my Good Humor days for something more sophisticated.  Recently, I found the above carton/jar of gelato.  I was immediately drawn to it, because of its unique clear packaging.  I think it's brilliant. This way the consumer has an idea of what he or she is getting. Sometimes you buy ice cream on sheer description alone and hope that the flavor meets your expectations.  For this brand you can also taste with your eyes as well.  The textures and swirls of flavors like White Chocolate Raspberry, Black Cherry and Caramel Cookie Crunch and the bold bright color of a Blood Orange Sorbet come through a simple transparent container and naturally add color to the packaging.  I'm glad to say that indeed the gelato is as delicious as it looks.  It has a homemade taste vs. an overly sweet manufactured product.
So what pairs better with ice cream than strawberries.  Last weekend my husband and younger son headed to a local farm in Shelton, CT as strawberry season was officially on.  It's a great place where you can pick strawberries and blueberries when in season and Christmas Trees in the winter time.  They have a sort of a flat bed covered truck called the "Berry Ferry" that takes you out the field where you go with basket in hand and collect your fill.  The squatting is also great for your thighs. Usually the cost per pound is more expensive than what you would get in the store (and you're doing the labor), but they are organic and you are mostly paying for the experience. 


Frozen Strawberry Jewels from the Farm
 
We loaded up 8 lbs, so what I we didn't eat fresh, we frozen and stored for later use.  I have a recipe for an incredible strawberry tea bread, which I will share with you shortly. This day job is really cutting into my blogging time.  We also planted some of our own strawberry plants this year, so we'll see how that goes.

Enjoy these pleasures of summer... individually or together.

Tuesday, June 14, 2011

Guest Contributor - My husband Paul's Pastitsio

Featured Ingredient:  Diced Tomatoes

Now that I've gone back full time into the workforce, I don't have as much time to devote to my blog. My cooking is pretty much reserved for the weekends and my husband takes over during the week.  This basically means manly meals, that are usually calorie-laden and full of fat (which usually also means good). Most are not the best choice for my figure, but beat the hell out of having to start from scratch at 7:30 p.m. (after walking the dog).  Otherwise I have to go my repetoire of under 5 minute meals - because I'm starving. One can only have so many egg and cheese sandwiches and soup.

Now that my husband is the weekday chef, it seems he has blogging aspirations. Recently I found pictures of my husband's Pastitsio recipe on the camera, and figured that is a perfect example of Uncanny Goodness.  To me it's the Greek offspring of beefaroni and moussaka. Aside from finding entry ideas for my blog, I've also been treated to random photos of me filling my bird feeder in pajamas, my butt, and other candid beauties. (Please don't mind that I don't share these).

Pastitsio is a great Sunday dinner. I like to reserve Sunday's for something that will deliver multiple servings.  Then I know when I come on Monday and maybe even Tuesday, I just have to nuke my way to quick and satisfying meal. Making hamburgers for example is a not a good use of time, as they don't reheat well the next day and after everyone finished there are no leftovers.  Stews fit this bill perfectly.  But as the weather has gotten a little warmer, I've moved on to casseroles which are also a perfect candidate.  A delicious dining experience can be derived from a simple mish mosh of ingredients.

For the macaroni
1 1/2 cups of elbow macaroni
1 egg

For the beef mix
1.3 pounds of 85/15 ground beef
1 onion diced
2 cloves of garlic
1 – 8 oz can of tomato sauce
1 – 14.5 oz can of diced tomatoes undrained
1 TB red wine vinegar
1TB chili powder
½ tsp allspice
¼ tsp cinnamon

For the white sauce
3 TB butter
3 TB flour
¼ tsp black pepper
1 1/2 cups milk
1 egg beaten
½ cup Italian blend shredded cheese

Salt & Pepper as needed

Preheat oven to 350F

Bring a large pot of salted water to boil. Cook macaroni until al dente. Drain. Combine pasta and 1 beaten egg.

Meat Sauce: Cook ground beef, onion and garlic together in a skillet until meat is brown and onion is tender. Drain off fat.  Stir in diced tomatoes, tomato sauce, vinegar, chili powder, allspice, cinnamon.  Bring to boil and simmer for about 10 minutes.

White Sauce: Melt butter in a saucepan over medium and stir in flour and pepper.  Add the milk all at once. Whisk and stir until smooth thick and bubbly.  Beat an egg in a 2 cup pyrex measuring cup.  Slowly add hot liquid to temper the mixture - to ensure not scrambling the egg. Return egg mixture to the saucepan, stir in 1/2 cup shredded cheese.

In a square baking dish, add 1/2 the pasta mixture.  Next add all the meat sauce.  Then add the remainder of the pasta and top with the white sauce.

Bake for 30 to 35 minutes.  Let stand about 5 minutes before serving.  The white sauce will firm when cooked.


Sunday, June 5, 2011

Barbecue Pork Quesadillas with Spanish Rice


Featured Ingredients: Fire Roasted Tomatoes and Black Beans

Here is a delicious double duty meal.  One night make this simple pork roast.  You can even make the marinade in the morning.  Marinate your pork all day then throw it in the oven for about an hour after you come home. The barbecue pork roast recipe is primarily inspired by Paula Deen. The flavor and smell that this marinates imparts is a literal translation of an old fashioned package barbecue sauce in a container, without the artificial flavor you would get from, well, a pre-packaged sauce. 

Barbecue Pork Roast
1/4 cup worcestershire sauce
1/4 cup tamari
2 tablespoons honey
2 tablespoons cider vinegar
3 teaspoons freshly squeezed lemon juice
1 teaspoon dijon mustard
1 teaspoon salt
1/2 teaspoon celery seed
1/2 teaspoon black pepper
2 large cloves garlic minced
One 2 1/2 lb pork loin roast

In a bowl combine all ingredients.  Whisk together.  Pour into a resealable plastic bag and add pork roast.  Seal and marinate in the refrigerator for at least 1 hour or more.  No more than overnight.

Remove roast from bag.  Place on a rack in a roasting pan and discard marinade. Pour about 1 cup water into the roasting pan (only if pork is on a rack).  This helps form a dark rich barbecue au jus or gravy whatever you want to call it. It will be thin.  Save this for the next recipe.  Roast pork at 340 degrees for about 1 hour or until pork reaches 160. (Or at 325F if you have more time). Let rest 10 minutes.  Serve.  Strain out the leftover sauce, au jus or whatever you want to call it for the next day.

Barbecue Pork Roast
 NEXT DAY:

Barbecue Pork Quesadillas - Makes 10 or more 6 inch quesadillas

2 cups remaining pork roast sliced and diced
1 cup black beans rinsed
3.5 oz. salsa (my husband gets these single serve packages which are great for recipes like this when you don't think you will use a whole jar).
1 tablespoon leftover au jus.
2 big blocks of monterey jack and cheddar cheese grated.
20 (2 packs) 6 inch soft flour tortillas

Slice and dice remaining pork roast. 

Mix with beans, salsa and au jus.  Grate cheese.
Heat a griddle to medium heat.  Spray with cooking spray.

Heat oven to 275 degrees.

Place cheese and pork mixture in the middle, leaving about a 1/2 inch border by first layering a large pinch of cheese on the bottom of the tortilla.  Add a couple of tablespoons of pork mixture and then another pinch of cheese on top.  You can alternate with monterey jack and cheddar or use one kind.

Place gently on a griddle and press down. Cook uncovered for a few minutes until bottom tortilla starts to crisp up.  Flip carefully with a spatula and repeat on other side. 

Not Pancakes
Place on a broiler pan or rack in the oven (with preferably something under it to keep warm and finish heating through and catch any oozing cheese).  I find if you put it on a pan with tin foil, the bottom gets a little soft and soggy.

Before you start cooking the quesadillas and are about finished with your prep is a good time to put on your rice.

Spanish Rice

1 tbsp extra virgin olive oil
1/2 cup onion finely chopped
1 large clove garlic minced
1 1/2 cups Carolina Long Grain Rice
1 can Fire Roasted Tomatoes
3 cups chicken broth
1 tsp dried oregano
1/2 tsp ground cumin
1/2 tsp turmeric
1 tsp salt

Heat olive oil in a 10 inch skillet.  Add onion and a little salt to release moisture and saute for a couple of minutes. Add rice and toast until some kernels are translucent.  Add garlic and saute 1 more minute. 
Add tomatoes, broth and spices.  Bring to a boil and reduce to a low/simmer.  Simmer covered for about 10 minutes.  Stir rice and continuing simmering about another 10 minutes until rice is cooked through.

Serve your quesadillas and rice with a simple guacamole.  Mix one soft avocado with juice from half a lime.
Barbecue Pork Quesadillas with Spanish Rice and Simple Guacamole


Sunday, May 29, 2011

Memorial Day Picnic - Grilled Caribbean Chicken with Mango Avocado Spinach Salad

Featured Ingredient: Crushed Pineapple

Since the weather seemed to change literally overnight from damp, dreary and chilly to something more summer like, my family and I figured we would break in the picnic table last night and resurrect the grill.  This got me thinking about what I was going to make for Monday's celebration.

As you are perusing recipes for your Memorial Day festivities or even another summer party, I would like to offer this for your consideration. While I only cooked for a small intimate crowd. The below serves at least 8.

This is by far my favorite chicken recipe... ever. It was my favorite recipe long before Uncanny Goodness. Now that a warm spring is upon us, I wanted to share it with you.  It's from the June 2000 issue of Working Mother, when I was 8 months pregnant with a 3 year old in tow.  Searching for an easy to prepare recipe yet flavored for an adult palate, I came across this article. Something about the sweet, citrus and spicy notes infused by the marinade married with the char of an open flame is nothing short of magical. It pairs well with Mango Avocado Spinach salad (recipe follows) and fragrant white basmati rice.

You can use any part of the chicken for this.  Last night we used breasts.  I think the best choice is boneless thighs.  They cook quicker than bone-in chicken parts and are meatier and juicier than breasts, that dry out more easily.  I used to have a grill that used to char everything way before it was cooked.  So I would sear the outside of the chicken and infuse the outdoor grill flavor and finish them in the oven at 375F.  This is another strategy that works. The grill is key however for that smoky punch.

If the flavor profile of the chicken is far too sophistacated for your child's or chldren's taste, create these for them with some hamburger and save more chicken for you!
Hamburger Faces


Grilled Caribbean Chicken - Serves 8

8 pieces bone-in or boneless chicken pieces (drums, thighs, or whole breast halves)

Marinade:
1 can 8oz crushed pineapple (2 are pictured but you only need 1)
4 tbsp lime juice
4 tbsp dijon mustard
4 tbsp vegetable oil
3 large cloves garlic
1 tbsp plus 1 tsp light brown sugar
1/2 tsp dried thyme
2 tsp ground allspice
2 tsp ground cloves
1 tsp salt
1/2 tsp black pepper.

Rinse chicken and pat dry. 

Squeeze juice from pineapple can into a liquid measure and add enough pineapple to equal a 1/2 cup.
In a large resealable bag add the rest of the marinade ingredients.  Add chicken and squeeze out as much air as possible out of the bag.  Marinate for at least 1 hour or up to 1 day.

Remove chicken from marinade and shake off excess.  Throw marinade away!

Preheat grill. Oil rack and place over medium heat. Grill chicken skin side down first to sear.  When grill marks are achieved turn chicken.  Cook depending on size of meat until a meat thermometer registers at 175 for thighs and 165 for boneless breasts.  Remove from heat to a plate and let rest a few minutes under tin foil. Again, if you are working with large pieces of  bone-in chicken like whole chicken legs, you can sear them and finish them in the oven.

Grilled Caribbean Chicken
An even more simply accompaniment is the Mango Avocado Spinach Salad.  Basically that is all the ingredients except for a few splashes of balsamic vinegar dressing.  The bright note of the mango and creaminess of the avocado is a perfect match with the seasoned chicken.

Mango Avocado Spinach Salad - Serves 8

2 large mangos
2 avocados
A few handfuls of baby spinach.
A couple of dashes of balsamic vinaigrette dressing.

Peel mangos and slice the cheeks around the pit.  Slice thinly.
Peel avocado.  Remove pit and slice about the same width as mango.
Wash spinach and add as much as you like.
Drizzle and toss salad with prepared balsamic vinaigrette dressing right before serving.


Happy Memorial Day!

Caribbean Chicken, Basmati Rice and Mango Avocado Spinach Salad


Friday, May 27, 2011

Refreshing Thai Cucumber Salad


Tamarind Juice
Featured Ingredient: Tamarind Juice

Last weekend the cuisine of choice was Thai.  Grilled Lemongrass Pork Tenderloin, Bok Choy, Basmati Rice and a Refreshing Cucumber Salad.  Of all these, I thought the Cucumber Salad had the best blend of flavors.  After it was portioned out, my husband asks me "Did you take a picture?"  In the rush of putting all the elements of dinner together, it completely didn't occur to me that I used a canned ingredient. I even served it in one of the dishes I use for my photos.

In my defense, I normally don't put recipes on my site if the item hasn't been tested or came out well. Sometimes it's frustrating when I take pictures throughout the prep and find the final product is average at best. I hadn't tried this salad before, so I didn't know this Thai-inspired vinaigrette would be a perfect blend of sweet, sour, salty, spicy with a bright crunch. Next time I make it I will add the finished photo. 

OK, while this recipe fits well with Time Saving... Tamarind Juice is not the most run of the mill ingredient.  However, if you live in or near a metropolitan area, this can be found rather easily in International Markets, or even in a large chain like a Stop & Shop in more ethnically diverse communities.

Tamarind has sweet and sour taste and there is no clear cut substitute.  I found some sites on the web that recommend how you can reach a similar taste profile.  But I haven't tried them, so I don't feel comfortable endorsing them.

This recipe is borrowed from All Recipes.  I thought it was so perfect in flavor, it didn't need any modifications. I ended up using Honey Roasted Peanuts, because as I was making dinner I realized we didn't have any peanuts.  So I sent my son out to get some.  Even though he called me on his phone to confirm what I asked for he still brought home the wrong thing.  Maybe he has a secret culinary talent, because they actually worked really well with the other ingredients. 

Never trust a 14 year old boy with his head in the clouds to do your grocery shopping.  But as he loves food like I do, he is one of my best critics.


Refreshing Thai Cucumber Salad
Serves 4

1/2 cup tamarind juice
2 tablespoons chopped fresh cilantro
2 tablespoons chopped peanuts
2 tablespoons rice vinegar
1 tablespoon brown sugar
2 teaspoons fish sauce
1-1/2 teaspoons red pepper flakes
2 teaspoons toasted Asian sesame oil
1-1/2 teaspoons minced fresh ginger root
2 cucumber, thinly sliced

Mix all ingredients in a large bowl.  Slice 2 English cucumbers in half lengthwise then cut the slices cross-wise. Add cucumber and coat with vinaigrette.  Cover and let sit in the fridge for 10 minutes before serving.

This is perfect summer side for grilled meats.

Sunday, May 22, 2011

Twice Tested Time-Crunch Turkey Meatballs

Can Do Cooking:  Turkey Meatballs - Made with Ground Turkey Breast.  Yes you can make this taste good!

Will it stop raining already?  I thought it was supposed to be April Showers = May Flowers.  Anyway, I have a love hate relationship with this time of year.  While hooray the weather is warmer, and everything is blooming, this means a fresh new crop of chores (pun intended).  
The part of spring I love


Beautiful Lilac has such a short window for beauty
Winter means only inside responsibilities, except for snow removal.  The warmer months mean planting, weeding, feeding,  mowing lawns, fending off insects and a bevy of other things besides indoor maintenance.  It's when construction starts, perhaps painting and spring cleaning.

With twice the work, you need to be as efficient as possible with your time. Quick prep meals are key.

One Sunday my husband brought home ground turkey breast. I've cooked in the past with Ground Turkey with some success.  But  ground turkey breast?  Low fat, and similar looking to ground chicken, it didn't really hold high hopes for something YUMMY.  My husband is not even a fan of ground turkey. He actually bought it on my behalf as he thought I would enjoy something bland and chewy. 

It had been a busy day, and I wasn't in the mood for "catering service."   In my house that means multiple meals to make everyone happy. Maybe I could turn it into make-shift spaghetti and meatballs and sell it my husband as well as my kids.  My youngest is very aware when I substitute a different type of meat, so it wouldn't be easy.

The Plan:

My inspiration was a recipe I had seen once for Seitan. If you have ever made or had Seitan, you know it's created by mixing water and vital gluten flour and is a vegetarian's meat.  As you can imagine the end result tastes like nothing. That said, it will take on any flavor you put into it.  Since beef is traditional in spaghetti and meatballs, my goal was to assimilate beef like characteristics into the turkey, which also has little flavor.  I had seen a recipe for "beef flavored" seitan.  The key ingredients were tamari and worcestershire sauce.... I thought, if I add this to turkey mixture maybe I can boost the flavor and make it less turkey-like. Indeed it was recipe for success.

Turkey Meatballs

Extra Virgin Olive Oil as needed
3 cloves garlic mashed into a paste or minced
1 lb. ground turkey breast

3 slices soft italian loaf bread
1/4 cup milk to moisten
1 egg beaten
1/4 small onion chopped
1/4 cup parmesan cheese (the finely grated kind)
black pepper to taste
1/2 tsp salt
5 to 7 dashes tamari
6 to 8 dashes worcestershire sauce
1/8 tsp allspice
Handful of italian parsley chopped
24 oz.  prepared jarred sauce.  Plus part of another jar for saucing your pasta.  I had best results with Prego Tomato Basil Garlic.

Chop garlic. Add a little salt and a little olive oil to your board and continue mincing. The oil and salt helps the garlic stay in one place. Scrape garlic with the back of a chef's knife to make something close to a paste.  (If you have a garlic mincer save yourself the trouble and run the garlic through there).

Combine the garlic and the rest of the ingredients in a large bowl. 

Run your hands under a slow stream of water to moisten them.  Shape meatballs into about 1  to 1 1/2 inch balls.   You may need to wet your hands from time to time.

Heat 1 tbsp oil in a heavy skillet over medium low heat.  Carefully drop meatballs into skillet in a clockwise direction.  (They are too fragile to drop in all at once, and this way you can keep track of which one has been in the longest and so on).  Cook meatballs on one side until a light crust forms and the meatballs don't stick as easily to the bottom of the skillet.  Turn them over with a fish spatula or delicate tool.

Pour a 24 oz. jar of desired jarred pasta sauce. NOTE: that is enough sauce to cook the meatballs but not enough for your pasta.  Heat up some more sauce for your pasta.

Turn up heat to a boil and watch just until pasta sauce starts to just bubble then turn down to simmer.  Make sure to cover quickly or you will have a big mess.

Simmer until meatballs are cooked through to 170F.  Cooking times will vary depending on how long you cooked them prior to adding sauce and what size they are.  Check after 10 minutes. Remove from heat and let sit for 5 minutes.    
These are also great in a meatball sub with melted mozzarella cheese.


Twice Tested Turkey Meatballs

Sunday, May 15, 2011

Chocolate Lace Sandwich Cookies


Quaker Oats
Featured Ingredient:  Old Fashioned Rolled Oats

Last night I had the rare pleasure of going out to dinner with my husband.  My oldest son is now 14 years old and I figured he would be willing and able watch his 10 year old brother for a couple of hours (at least for money).   After dinner my husband and I went to Home Goods to look for some bargains. For those of you who don't have Home Goods it is a discount store that's part of the TJ Maxx family which sells, as you might expect, all sorts of housewares.

While perusing the cooking and appliance section (big surprise) I came across a giant cookbook by bon appetit dedicated specifically to desserts.  Nearly 700 pages of anything and everything decadent from cakes to cookies, custards to candy.  200 recipes alone of something with chocolate in it. At $22 that was a no-brainer. You can also get a full year subscription to the magazine by buying the book (offer expires 5/31/11) so I got it just in time.

One of my goals for Sunday, besides adding a blog post, was to break in the cookbook.  I came upon a recipe for Lace Cookies with Chocolate filling.  When I was a little girl, my parents used to go Jutland Bakery in Darien, CT on Sunday mornings after church.   I would always ask for chocolate lace cookies.  That bakery is no longer there but my fondness for lace cookies with chocolate lives on.  Since it was Sunday, the recipe seemed appropriate. This is a cookie, I never made before.  It was actually quite easy.  The key is to have at least two racks and a decent size work area where to cool your cookies and then place them on paper towels to absorb any excess butter.

The recipe calls for 2 teaspoons orange zest.  I thought these were yummy but ended up with a little too much of an orange note for me.  I might cut back to 1 teaspoon and replace the other teaspoon with vanilla extract next time.

Chocolate Lace Sandwich Cookies - Makes 20 cookies

1 cup (packed) light brown sugar
2/3 cup old-fashioned oats (not quick cooking)
1/2 cup unbleached all purpose flour
1/2 cup sliced almonds
2 teaspoons finely grated orange zest (from 1 large orange)
1/2 tsp baking powder
1/4 tsp salt
1/2 cup (1 stick) unsalted, butter melted
1/4 cup whole milk
4 oz Ghiradelli bittersweet or seminsweet chocolate, chopped

Position rack in top third of oven and preheat oven to 350F.

Line a heavy rimless cookie sheet with a silpat or foil.  (I used foil).  Stir together brown sugar, oats, flour, orange zest, baking powder and salt.
Add melted butter and milk and stir well.  Let batter stand for 15 minutes.

The recipe book said 10 but I found with each batch, as the batter sat longer the baked cookies were less spread out and more uniform.

Drop batter by rounded teaspoonfuls onto cookie sheets, space at least two inches apart.  (You will be surprised that 1 teaspoon makes such a large cookie.  They are twice the size you would see in a bakery.)

Bake for 9 to 10 minutes until cookies are bubbly and golden brown.  Remove from oven. NOTE: the cookies will be very soft and will fall apart if you try to move them individually at this time - they will harden and stick together as they cool).  Carefully slide baking mat or foil with from cookie sheet with cookies on it onto a rack to cool.  Once cooled remove cookies with a small offset spatula by sliding it under them and then transfer to paper towels to absorb any excess butter.   Use clean foil or mat for each batch.

Lace cookies out of the oven

Marry up matching size cookies and line a baking sheet with foil.  Melt chocolate in double boiler.  Spread a little bit of chocolate on the bottom side of one cookie.  Press a similar size cookie on top and place on cookie sheet.

Repeat with other cookies.  Once completed place cookie sheets in refrigerator to cool and solidify chocolate.  

Enjoy your piece of crispy chocolate heaven.

Chocolate Lace Sandwich Cookies
This post is linked to: Make Ahead Meals for Busy Moms

Saturday, May 7, 2011

Dinner after a Day at the Bronx Zoo - Chicken Enchilada Suizas

Green Chiles
Featured Ingredient: Green Chiles

Yesterday, I went with my child's 4th grade class on a trip to the Bronx Zoo.  It was the culmination of their Endangered Species project where they got to see up close (or as close as safety permits) some of the animals they learned about and grew to love over the last couple of months. It couldn't have been a more beautiful day to experience that.  Once you got into the zoo, you were free to roam about, I didn't really have to chaperone any other kids, so it was a nice opportunity to spend time with youngest son.  As I also love animals and wildlife, signing up for this trip was a no-brainer.

We got to the zoo about 10:30 a.m. (after sitting in traffic for two hours) and had until 3:00 p.m. before we were travel back in the same two hour traffic.   Needless to say I got my exercise, going from one side to the other, trying to hit every exhibit.  When we returned back to school,  I felt like this:

I was pretty exhausted, but still had to get dinner on the table.  In this situation I tend to lean towards easy Mexican dishes.  With some pre-cooked ingredients you can create a quick and satisfying family meal in a relatively short amount of time without too much effort.

One of my favorites in Enchiladas Suizas.  While the "suiza" really refers to Swiss cheese, I prefer Monterey Jack.  If you are not a fan of burn-your-throat spicy but like flavor, this is great meal. Serve this with one of the Goya Rice Mixes and maybe "Mexicorn" in a can... and you are "bueno a ir" (good to go).

Enchilada Suizas - Serves 4 to 5

3 cups shredded or chopped cooked chicken
2 jars (8 oz. each) Ortega Green Taco Sauce (Mild) - Made with Green Tomatoes and Tomatillos
2 1/4 cups grated Monterey Jack Cheese
1 4 oz. can chopped mild green chiles
1/8 cup chopped cilantro (chopped cilantro should equal scant 1/8 cup)
1/2 tsp ground cumin
1 package flour tortillas 10 count (6 inch diameter)
Scant 1 cup sour cream
2 to 3 scallions for topping/garnish

Preheat oven to 375F

In a large bowl combine chicken 1/4 cup taco/tomatillo sauce, 3/4 cup shredded cheese, cilantro, cumin and green chiles.

Mix sour cream and taco/tomatillo sauce in about equal parts.  Scant 1 cup sour cream to 1 cup taco sauce.

Wrap tortillas in damp paper towels and microwave for 1 minute to make more pliable.

This would be a great stopping point to put on the Goya rice mix, as it takes 25 to 30 minutes, so each dinner element finishes at about the same time.

Spread about 1/2 cup sour cream/taco sauce mixture on the bottom of a 9" X 13" in baking pan. 

Add about 1/3 cup of chicken mixture in the middle of the tortilla.  Fold top and bottom portion of tortilla toward center.  Roll in left and right side, being sure that top portions are tucked in.  Place seam side down. Repeat with other tortillas.  Sprinkle with remaining cheese and sprinkle with scallions.


Bake in a 375F oven for 20 minutes until bubbly and heated through.  To add additional color you can broil for additional 2 minutes or so until desired color. 

Now your rice should be done and if you opted for frozen vegetables you probably put these on somewhere after the enchiladas were baking.
Enchilada Suizas Deliciosas
Una buena cena para su familia! (Mr. Forte your teaching is not lost on me some 30 years later... God Rest Your Soul!)


Wednesday, May 4, 2011

Vegetable Lasagna with Parmesan Bechamel Sauce - Take Two

Featured Ingredient: Ricotta Cheese

In sunny 60 degree weather, what do you serve?  It's too high up on a thermometer for a heart-warming stew.  It's hardly the dog days of summer when something grilled with a side of fresh salsa is in order. I think this is the perfect territory, for something fresh, yet filling and cheesy -- like a vegetable lasagna. A great way to take advantage of spring's fresh bounty of produce appearing in your supermarket, at more affordable prices.  The most prominent right now is Asparagus.  Nothing says spring more than those long slender stalks that my son used to call "trees."

I'll admit this is not a time-saving recipe.  But it's worth the work.  You can think of it as saving time during the week, as you can make a big batch in 9" X 13" pan and reheat portions the next couple of nights, depending on the size of your family.   You can also reduce prep time as I did in this recipe with no boil lasagna noodles.  The lasagna is layered with a mix of asparagus, broccoli (mostly florets), fresh spinach and shredded carrots along 3 cheeses (parmesan, ricotta and mozzarella) along with a creamy flavor infused bechamel sauce.  I thought it would be too heavy, but because the vegetables are so light, it actually works well.
I'm calling this take two as the last time I attempted it using a different strategy, but the same basic recipe, my lasagna was lacking height and bulk and ended up on the watery side.  Fortunately this version is not dry, nor do you have to worry about floating pasta... well maybe not exactly floating but wading?

Key things ensure your vegetable lasagna does not come out watery whether you use boil or no boil noodles.

1. After you saute your vegetables let them drain off any excess moisture.

2.  If using no boil noodles, don't let them sit in water to be a bit more pliable.  (Except for maybe the top layer pieces, as they are not weighted down with as much liquid and moisture as the middle and bottom layer of pasta.) You end up having more than enough moisture in this recipe so use them dry as it gives them something to soak up. 

3.  Add an egg to your ricotta. In baking, eggs are used to set liquids, batters etc.  So it doesn't hurt to have them add a little bit of their protein to help the cause. (Plus it seems to make the ricotta fluffier).

Vegetable Lasagna with Bechamel

Sachet D'Epice
1/4 small onion
1 bay leaf
10 black peppercorns
Cheesecloth and Butcher String

Make a sachet d'epice.  I learned this in culinary school.  Wrap a quarter of an onion, a bay leaf and about 10 peppercorns into cheesecloth and tie with butcher string. This helps infuse the onion flavor into your bechamel sauce, while keeping it silky and free of little bits of onion.

Sachet d'epice


Parmesan Bechamel Sauce
5 tbsp butter
4 tbsp flour
4 cups milk
1 tsp salt
1/8 tsp ground fresh nutmeg
1/4 cup finely grated parmesan cheese

Preheat oven to 375F
Melt butter into a large saucepan over medium heat and whisk in flour to form a loose roux. Stirring very frequently let this bubble for a couple of minutes or until it reaches a golden color. 
Whisk in milk slowly for the first cup then add the rest.  Attach your sachet to the pan handle and dip into pan. Add salt. Continue whisking until milk comes up to temperature and mixture begins to thicken.  Stir in nutmeg and parmesan cheese.  Remove from heat and keep warm.

Parmesan Bechamel


Vegetable Lasagna
9 no boil noodles
Extra virgin olive oil as needed
4 cloves garlic minced
10 oz fresh baby spinach (I used one 5 oz. box and the spinach literally disappeared as it cooked down)
One large bunch fresh broccoli (I mostly used the florets and the top portion)
2 cups shredded carrots
20 large asparagus spears
(Bottom line is you are looking for at least 6 to 7 cups of cooked vegetables)
32 oz. Part Skim Ricotta cheese (most of the container)
1 beaten egg
1 block grated Part Skim Mozzarella cheese (like Polly-O) not the fresh kind remember too much water content
Grated Parmesan cheese as needed
Salt and Pepper as needed
Fresh Parsley for garnish

Heat 1 tbsp olive oil in a large skillet.  Add spinach.  Saute one minute and 2 cloves garlic, salt and pepper.  Cover and steam/saute until bright green and wilted.  Remove to a colander over a large bowl and let drain.

Add more olive oil if needed and add broccoli, asparagus and carrots.  Saute one minute to release moisture and add 2 cloves garlic, salt and pepper.  Like the spinach cover and steam/saute until vegetables are still bright and crisp tender.   Remove to colander with spinach to drain.

Mix ricotta (nearly the entire container) with egg.

Begin assembly. Lightlhy cover the bottom of the pan with bechamel sauce.  Add three no boil noodles going across, spread apart evenly.  Lightly spread a good amount of ricotta cheese on the pasta, top with heaping spoonfuls of the vegetable mixture cover with bechamel sauce.  Then sprinkle with mozzarella cheese.
Add another layer of pasta and repeat.
Add final layer of pasta. If you soaked these in hot water for a few minutes.  Pat them dry before you add to the pan. Pour over bechamel sauce and top with mozzarella and parmesan cheese.


Tightly cover the sides with tin foil, but carefully tent the top as to not have the cheese stick to the foil.  Bake for about 40 minutes.  Remove foil and let bake an additional 10 minutes until bubbly.   If it still doesn't have that nice golden color.  Broil for a couple minutes until desired color.

Let rest on a rack for 15 minutes.

As with all lasagnas, it will taste better and come out the pan better the next day.  Hey it may have been hard work, but you don't have to worry about dinner tomorrow.
Vegetable Lasagna with Parmesan Bechamel Sauce